App login with Twitch, Steam, Discord, Facebook or Google
This article will explain how to implement a 3rd party login interface in your Overwolf app.
The main challenge here is figuring out how to transfer the info that the auth window gets from the external service back to the OW app.
As Google (and possibly other providers in the future) will discontinue support for sign-in from embedded browser frameworks (e.g., OW browser) starting Jan. 2021, the best way to go is to send the user their default browser, and not use the OW browser.
In the future, we will add some instructions on how to do that. Meanwhile, you can use the suggested workaround explained in this article.
Sample app
In our APIs sample apps repository, you can find and download three sample apps that demonstrate how to integrate 3rd party login interface:
- The
Twitch Sample App. Demonstrates how to implement login to your OW app using a Twitch account. - The
Steam Sample App. Demonstrates how to implement login to your OW app using a Steam account. - The
Google Sample App. Demonstrates how to implement login to your OW app using a Google account.
It's a great place to get started - All the samples in this repository are built with JS code and demonstrate primary usage in the API.
Server side code
Note that the above sample apps work "out of the box" - download and install each app as an unpacked extension, or you can create an OPK for each app and install it. After installing, you can immediately see a real live example of an app that integrated Twitch/Steam/Google login flow. No need to configure any server, as the sample apps use our servers.
You can find our server-side code in the repository. And you should implement it on your server if you want to integrate a login button in your app. When you are ready to integrate the login button in your app, you should also implement this server-side code in your server.
Functionality
The sample app's functionality is pretty straightforward: You launch it, open the dev console (to see all the debug messages), and hit the Login button to open the Twitch/Steam authentication window in the default user's browser. After successful login, you can Log out, or Get user to get the Twitch/Steam user info.
In Twitch login, you can also get the current Channel:

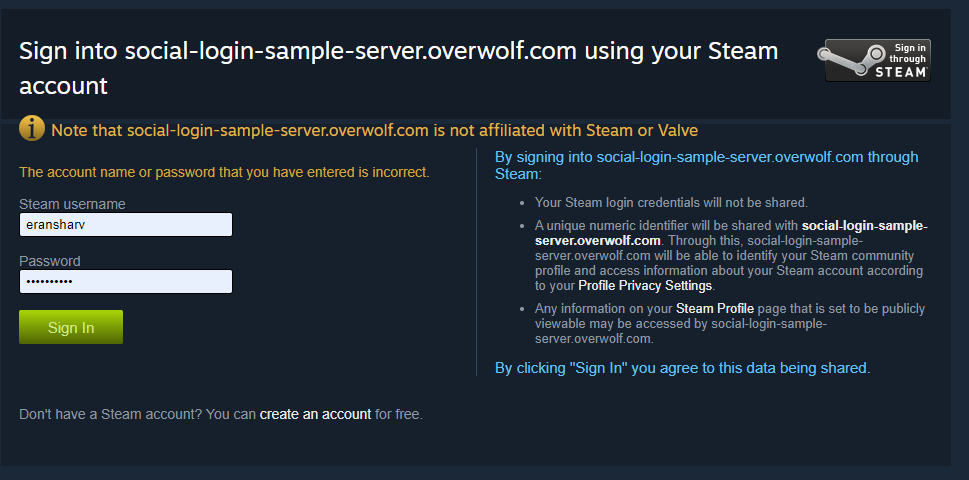
Here you can see the Steam authentication window:
Of course, that all the time, you can look at the dev console to see the status of each call (success, failure, etc.).
Setting up
Download the app's source code from the repository as a zip file, and extract it to a new folder on your machine.
Load the app as an "unpacked extension" (Note that to do that you have to whitelist your OW username as a developer).
- Open the Overwolf desktop client settings (by right-clicking the client and selecting "Packages" Or by clicking on the wrench icon in the dock and going to the "About" tab => "Development Options").
- Click on "Development options".
- In the opened window, click on "Load unpacked extension" and select the extracted
twitch-login-samplefolder. This will add the Twitch login sample app to your Overwolf dock. Do the same with thesteam-login-sampleto install the Steam login sample app. - Make sure you are logged in to the OW client. Otherwise, you will get an "Unauthorized App" error message. (Click on the "Appstore" icon in the OW dock to login to the OW client).
- Click on the app's icons in your OW dock to run the apps.
Login Flow
This is a suggested login flow into Twitch using their OAuth2:
Prerequisite
Register your app on Twitch
To make an app that uses the Twitch API, you first need to register your app on the Twitch developer site.
When creating this app, enter your redirect URI, where your users are redirected after being authorized.
As Twitch doesn't accept URIs where the top domain is not HTTP, you can't use the OW URI scheme (overwolf-extension://..).
As a workaround, we set a static login page on our server as the redirect URI. Within this page, we can easily use an OW URI to redirect back to our OW app. Jump to the next chapter, create the static page, and get back.
Once you create a developer app, you'll be assigned a unique client ID for your app.
Create a static logic page
On your server, Create a static login page. Let's call it index.html.
Redirect back to your app login page:
window.location.replace(`overwolf-extension://[EXTENSION-ID]/dist/login/login.html${location.hash}`);
To enable the user's browser to open this custom handler, we will later add the url_protocol to the app's manifest.
In addition, replace the [EXTENSION-ID] with your extension's id.
The URL hash is the Twitch auth token sent back to the app.
Now that you have a live static login page on your server, go back and set the Twitch redirect URI.
Create a dedicated login window
Add a new window in your app's manifest, for the authentication process:
"login": {
    "file": "dist/login/login.html",
    "transparent": false,
    "resizable": true,
    "show_in_taskbar": true,
    "desktop_only": true,
        "size": {
            "width": 600,
            "height": 600
        }
}
Set externally_connectable
Add to your app manifest the externally_connectable flag with the Twitch URL:
"externally_connectable": {
    "matches": [
    "http://*.twitch.tv", //make sure that the end of URL is WITHOUT any slash/backslash
    "https://*.twitch.tv"
    ]
}
Set url_protocol
Register the custom handler to support opening an OW application from a browser using a link:
"url_protocol": {
    "scheme": "overwolf-extension"
}
1. Open the login window
When the user clicks on the "Login with Twitch" button in the app, open the dedicated login window.
2. Check for existing auth token
When the login window starts, the first thing to do is to check if the user is already logged in:
As mentioned earlier, the Twitch auth token is sent back to the app through a URL hash.
So we can check the location.hash:
If location.hash is not set - the user is not logged yet. We continue the redirection to the Twitch login URL (step 3).
If location.hash is set - the user successfully passes the Twitch login and redirects back to here (app's login window) with the auth token.
We save the auth token and close this window (step 4)
Note that at this point, you may also want to add also an error handling mechanism.
3. Redirect to Twitch login page
Manually navigates (window.location.replace) to:
https://id.twitch.tv/oauth2/authorize?client_id=${clientId}&redirect_uri=${fullRedirectUri}`
Where clientId is your Twitch clientId and fullRedirectUri is your static login page that we set earlier.
4. Return back to the app
After we successfully logged in to Twitch, we can save the auth token and close the app's login window.
You can save the auth token in a localStorage variable. We recommend encrypting the hash/token before storing it - for security reasons. You can use the overwolf.cryptography API for that.
5. Close the Log In window.
Now, we can safely close the login window.
The login process is complete.