Implementing Plug-ins
When you finish developing your plugin, you should sign it to avoid security and deployment issues. Here you can find more on how to sign your code.
To implement an existing plugin for use in your app, follow these steps:
Place the plugin’s DLL file or files in your app’s directory as well as inside your OPK when you create it.
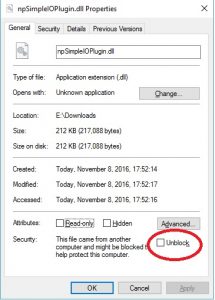
Make sure the DLL is "Unblocked". Windows automatically marks downloaded DLLs as unsafe and you will have to go into file properties and check the 'Unblock' option there.
- Declare the plugin in your manifest.json under the
data.extra-objectsproperty. For example:
"data": {
"extra-objects": {
  "simple-io-plugin": {
    "file": "files/plugins/simple-io-plugin.dll",
    "class": "overwolf.plugins.simpleio.SimpleIOPlugin"
    }
  }
}
This tells Overwolf that your app contains a plugin named: simple-io-plugin which can be found inside the file: files/plugins/simple-io-plugin.dll with the .NET class name overwolf.plugins.simpleio.SimpleIOPlugin.
- Create an instance of this plug-in in your app's Javascript code:
var _plugin = null;
overwolf.extensions.current.getExtraObject(“simple-io-plugin”, (result) => {
  if (result.status === “success”) {
    _plugin = result.object;
  }
})
Now you can call on the plugin’s functions, events or properties directly.
Take a look at our Process Manager plugin on GitHub, for an example of using plugins. You can find there a generic helper class for initializing the plugin, so the initializing will look like this:
var plugin = new OverwolfPlugin("process-manager-plugin", true);
Feel free to use or modify it in your own app as needed.