Video capture best practices
Overview
Overwolf offers two APIs with video capturing capabilities:
- Mainly used to capture short highlight video replays of the currently running game.
- You can capture a highlight manually, or you can use auto-highlights capturing.
- Meant only for video capture to the local hard drive, without streaming.
- Mainly used to capture long videos of the currently running game, up to a full game capture.
- Only manual capture is available, No auto-highlights capturing.
- In addition to local capture, streaming option is available to supported services like Twitch, YouTube, Facebook, etc.
Required Permissions
Using any of the above APIs requires the VideoCaptureSettings permission flag in your app manifest: Only apps with this permission will be defined as capture apps which can be configured in the OW client "capture" tab (see /api/manifest-json#permissions-array)
Notes
- For playing a video from the local disk (using absolute file paths instead of the generated Overwolf "media://" path), you require adding allow_local_file_access: true flag in your app manifest.
- There is a problem with playing a video from the local disk when your app is running from within an iframe that is on a non-local domain.
See for an example the overwolf.streaming.stop() documentation.
Choosing the right Encoder
When capturing a video, a "video encoder" is used.
Both of the APIs, overwolf.streaming and overwolf.media.replays offer ways to manually set a video encoder or use the default encoder that the user defines through the OW client UI.
To get the best capture results according to your requirements, It is highly recommended to check which encoder is set before capturing videos in your app. You can get the list of available encoders for the current user using overwolf.streaming.getStreamEncoders().
There are CPU/software-based encoders, like the X264, and there are GPU based encoders from Intel (QSV), NVIDIA (NVEnc) and AMD (VCE). CPU encoding is focused on quality where GPU encoding is focused on speed. So CPU/software encoders like the X264 are quality wise better than GPU based encoders.
If you can accept lower quality or higher final bitrate then GPU encoder will be faster, if your goal is highest possible quality at lowest possible bitrate then CPU based encoder will be closer to your goal at a cost of encoding time. Just remember that CPU/software encoders like X264 consume a lot of CPU and might cause some lagging videos or other issues, mostly if the capture resolution or FPS are set to high in through the OW client.
If you recognize that the user is using a CPU/software-based encoder, like the X264, it's recommended to choose one of these options:
- Without notifying the user - manually override the user encoder with other available GPU-based encoders.
- Note that these settings will apply only to your app and will not change the encoder settings as defined by the user through the OW client UI.
- With Notifying the user - let them know that the chosen encoder might cause low-quality video captures.
Then, let the user decide if they want to change the encoder to other GPU based encoders, or choose to lower the resolution and/or FPS.- You can use this suggested warning window with a link to the "capture" OW client settings.
Windows 10 Hardware-Accelerated GPU Scheduling notice
The Hardware-Accelerated GPU Scheduling feature is currently supported on Windows 10 version 2004 or Build 19041 and Nvidia latest GPU driver (451.49).
When set to On, it might cause captured videos to be laggy/choppy.
You can detect if it's ON by calling overwolf.utils.getSystemInformation(). The callback object contains the HAGSEnabled property that can be true or false.
If you detect it is ON, you should display a warning to the user with a link to set this setting to OFF.
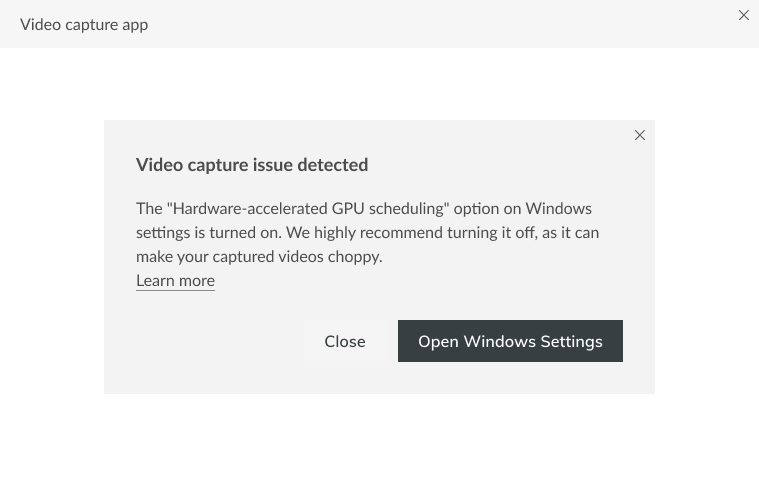
Suggested warning window
We attached here a recommended warning window design to inform the user that a video capture issue is detected, with a button that opens the relevant Windows Graphics settings.
- Window Title: Video capture issue detected.
- Body: The "Hardware-accelerated GPU scheduling" option on Windows settings is turned on. We highly recommend turning it off, as it can make your captured videos choppy.
- Learn more: link to our support knowledgebase for detailed info.
- Primary button: Open Windows Settings by calling:
- Secondary button: Close.
Screenshot:
Comparison table
To summarize, these are the main differences between the overwolf.media.replays API to the overwolf.streaming API:
| Feature | overwolf.media.replays | overwolf.streaming |
|---|---|---|
| Auto-highlights capturing | + | - |
| Manual capture | + | + |
| Custom capture length | + | + |
| Streaming support | - | + |
Recording resolutions
The capture APIs (overwolf.media.replays and overwolf.streaming) support alternative recording resolutions.
Note that it's not mandatory, and you don't have to set it explicitly if you don't need/want to.
You can choose one of the following recording resolutions types:
- Original - Original calculation to get the output resolution for the needed quality keeping the aspect ratio.
- Exact - get the same/exact resolution quality the user wanted (1080, 720, 480), keeping the game's original aspect ratio.
- Close - find from the generated list the closest entry to quality the user wanted, keeping the game's original aspect ratio.
How to use
Before you start the capture (in both capture APIs), you have to define the video options in your settings. In this object, you can set the base_frame_size_source and frame_size_method.
An example:
 let settings =
 {
   "video": {
      "base_frame_size_source" : overwolf.streaming.enums.eVideoBaseFrameSizeSource.Auto, // Setting|Auto, if not set, "Setting" is the default
      "frame_size_method": overwolf.streaming.enums.eVideoFrameSizeCalcMetho.Original  // Original|ExactOrKeepRatio|ExactOrClosestResolution
   }
 };
Using overwolf.media.replays
With this API, you can listen to game events and manually start and stop video capture.
With auto-highlights capture enabled, there's no need to understand each supported game's mechanics, game flow, edge cases, timings, etc. Just request any supported game's highlight, and OW provides you with a video file that includes this event.
Here you can find a list of auto-highlights supported games.
Below, you can find a description of both capture methods: manual capture and auto-highlights capture.
Manual Capture
Basic usage flow:
Register to relevant capture events for your app.
- The available events are: onCaptureError, onCaptureStopped, onCaptureWarning, onReplayServicesStarted.
Choose the right video encoder
- Get the available stream encoders: Call getStreamEncoders().
(You can also call getAudioDevices() and choose a specific audio device). - This returns a list of all possible encoders and audio devices – you can then use this list to let users select their preferred encoder/device.
- In terms of encoder priorities – we recommend: NVIDIA > AMD > INTEL > x264. (This is also the order used to select the default encoder)
- As long as the "enabled" encoder's property is set to true, you can offer users to use this encoder.
- Note that you don't have to set the Encoder explicitly. Instead, the API will automatically use the default encoder for this machine.
- More info can be found in the Choosing the right Encoder section above.
- Get the available stream encoders: Call getStreamEncoders().
Call overwolf.media.replays.turnOn() with the auto-highlights feature disabled:
- Set the enable field of the overwolf.media.replays.ReplayHighlightsSetting Object to false.
- You may also set the capture buffer that is used for all the other functions:
For example, if you set a 3 minute buffer, you will be able to capture game highlights not longer than this buffer.
Listen to your game events and wait for the game highlight (match_start, kill, etc.) that you want to capture.
Once it occurred - start to video capture the screen:Call overwolf.media.replays.startCapture() methods:
- Note that it won't automatically stop until you call stopCapture().
- It's useful if you want to stop the capturing based on a future event. If you want to automatically stop after it reaches futureDuration, you can use capture().
- Note that in all methods, the replay ID returns via callback, and it is needed to finish capturing the replay.
Call overwolf.media.replays.stopCapture().
- Finishes capturing a replay and returns a URL leading to the created video file.
- Note that you only need to call stop if you called startCapture() without setting the futureDuration parameter. Otherwise, the capture is stopped automatically.
Call overwolf.media.replays.turnOff(), as soon as you’re no longer interested in capturing video in order to free up resources.
Auto-highlights capture
Basic usage flow:
Register to relevant capture events for your app.
- The available events are: onCaptureError, onCaptureStopped, onCaptureWarning, onReplayServicesStarted, onHighlightsCaptured.
Choose the right video encoder
- Get the available stream encoders: Call getStreamEncoders().
(You can also call getAudioDevices() and choose a specific audio device). - This returns a list of all possible encoders and audio devices – you can then use this list to let users select their preferred encoder/device.
- In terms of encoder priorities – we recommend: NVIDIA > AMD > INTEL > x264.
- As long as the "enabled" encoder's property is set to true, you can offer users to use this encoder.
- Note that you don't have to set the Encoder explicitly. Instead, the API will automatically use the default encoder for this machine.
- More info can be found in the Choosing the right Encoder section above.
- Get the available stream encoders: Call getStreamEncoders().
Call overwolf.media.replays.turnOn() with the auto-highlights feature enabled:
- Set the enable field of the overwolf.media.replays.ReplayHighlightsSetting Object to true.
Here you also set the capture buffer that is used for all the other functions. - With this mode, you don't need to start or stop the capture. It's done automatically.
- Once a highlight is captured, the onHighlightsCaptured event is triggered, and contain the URL of the created video file.
- Set the enable field of the overwolf.media.replays.ReplayHighlightsSetting Object to true.
Call overwolf.media.replays.turnOff(), as soon as you’re no longer interested in capturing, in order to free up resources.
Note that all the processes that use the auto-highlights mode considered to be a "single" user. So no conflicts. Few apps can work together and capture the same highlights.
Using overwolf.streaming
With this API, there is no auto-detect and auto-capture of the game highlights, as it mainly used to capture the full-length of the game (or stream it to Twitch, Youtube, etc).
You should mainly listen to when a game/match starts and when it end, and manually start and stop the video capture.
Usage flow
This is the basic usage flow:
Register to the relevant capture events for your app.
- The available events are: onStreamingSourceImageChanged, onStopStreaming, onStartStreaming, onStreamingError, onStreamingWarning, onVideoFileSplited.
Choose the right video encoder
- Get the available stream encoders: Call getStreamEncoders().
(You can also call getAudioDevices() and choose a specific audio device). - This returns a list of all possible encoders and audio devices – you can then use this list to let users select their preferred encoder/device.
- In terms of encoder priorities – we recommend: NVIDIA > AMD > INTEL > x264.
- As long as the "enabled" encoder's property is set to true, you can offer users to use this encoder.
- Note that you don't have to set the Encoder explicitly. Instead, the API will automatically use the default encoder for this machine.
- More info can be found in the Choosing the right Encoder section above.
- Get the available stream encoders: Call getStreamEncoders().
Call overwolf.streaming.start().
- Create a JSON object with all streaming details and call start().
Here you can find a complete usage example. - For video recording, you don’t need the ingest_server, stream_info, and auth objects.
- Increasing the keyframe_interval may help the performance but decrease in quality or inability to seek a specific resolution (if you want to slice the video, for example). We recommend using a value of 2, that offers a balance between picture quality and viewer join speed.
- increase the max_kbps of the encoder configuration may help the performance, but increase the video file size.
- For video recording, we recommend using a value of higher than 8000.
- For streaming, we recommend using a value smaller than 3000.
- Once start succeeded, you’ll get a callback with result.status == "success" and a stream_id that can be used to stop the streaming session or change the volume of the stream.
- Create a JSON object with all streaming details and call start().
Allow users to change volume.
- Allow the user to change volume with changeVolume() while streaming.
Call overwolf.streaming.stop().
- Call stop() to stop the streaming session.
Extras
- Use setBRBImage() when streaming to Twitch.tv when
capture_desktopis not enabled, this will allow you to customize the Be-Right-Back image that viewers will see. - Use setWindowStreamingMode for video recording and streaming – this method works on a per-overwolf-window basis – for each window you can decide if it is to be shown in the stream or not – regardless of whether the streamer is viewing it or not.
- Use setWindowObsStreamingMode when you aren’t streaming with Overwolf but want to leverage Overwolf’s APIs and stream with OBS.
External links
- Read more about Using the right "Rate Control" in OBS for streaming or recording.
- Read more about Boost your stream quality with these 3 simple settings.